It’s impossible to always be there at the specific time you need a coupon to go live for a new sale. Sometimes you want to email the coupon code before the sale with the dates the coupon is valid from and to.
That will get your customers excited and give you the luxury of scheduling everything from the marketing emails to the actual coupon itself. This is a commonly overlooked method of scheduling in WordPress that also applies to WooCommerce products and even coupons.
Yes, it works the same way as scheduling a post.
Here’s how to create a new coupon and schedule it to publish on a specific data and time.
Scheduling A WooCommerce Coupon
When you’re logged into your WordPress website with WooCommerce installed, the first thing you need to do is create a new coupon in WooCommerce.

Step 1: Hover over or click on Marketing.
Step 2: Click on Coupons.
Step 3: Click the Add coupon button or edit a draft coupon if you’d like to schedule one you’ve already created.

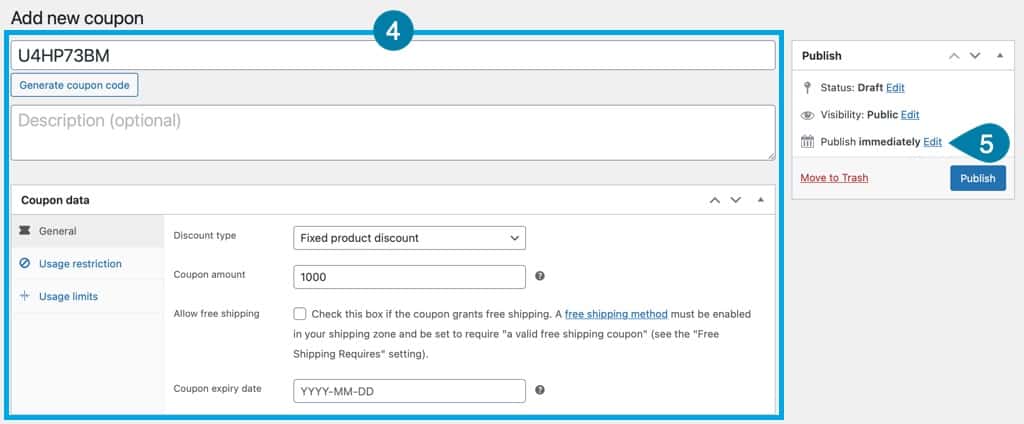
Step 4: Customize the coupon with a unique (or generated) code, the discount, usage restrictions, usage limits, etc.
Since you’re scheduling the coupon to publish, you likely also want to schedule the coupon to expire on a specific date. Keep in mind that the date you put for the expiration will be first thing in the morning on that date. So, if you put 2022-09-01 then it won’t work on that day and essentially will expire on 2022-08-31 at midnight.
Step 5: Once you’re ready to schedule the coupon, click the Edit link next to the ‘publish immediately’ line. We’re going to change that from immediately to the specific date and time you’d like the coupon to go live.

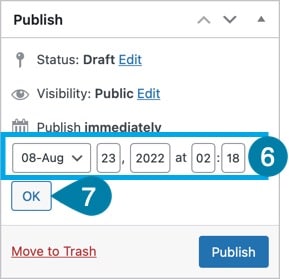
Step 6: Now you get a new edit line where you can choose the month, day, year, and even specific time you’d like your coupon to go live.
Keep in mind that this will be formatted based on your WordPress settings, so the order of each item will be different. Also, the time zone is your servers time and the time needs to be entered in 24 hour time (ie. 13:00 for 1:00 pm).
Step 7: After you’ve set the date and time, click OK.

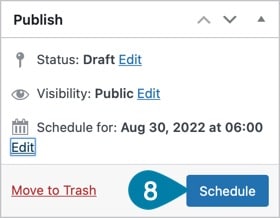
Step 8: After you click OK, you’ll see that the Publish button has now changed to Schedule. Click the Schedule button to schedule the coupon for your date and time.

Once you click the Schedule button and WordPress has done its thing, you’ll see a success (the green bar says success) notification pop up along the top of the screen until you dismiss it by clicking the X.

Once your coupon has been scheduled you’ll see it in your list of coupons with the word Scheduled beneath it. Once the scheduled time has passed then the Scheduled will simply disappear and the coupon will be published.
Keep in mind that the scheduled time won’t actually publish precisely at that time. Because WordPress runs on cron jobs (a scheduled computer process) the cron job for WordPress must run and process that the coupon needs to be published. That means there could be a delay depending on how your server is set up. Cron job could run once every 30 minutes or on a good setup, it’ll likely only delay the coupon publishing by less than a minute.
That’s all there is to scheduling a WooCommerce coupon code!
Happy scheduling!